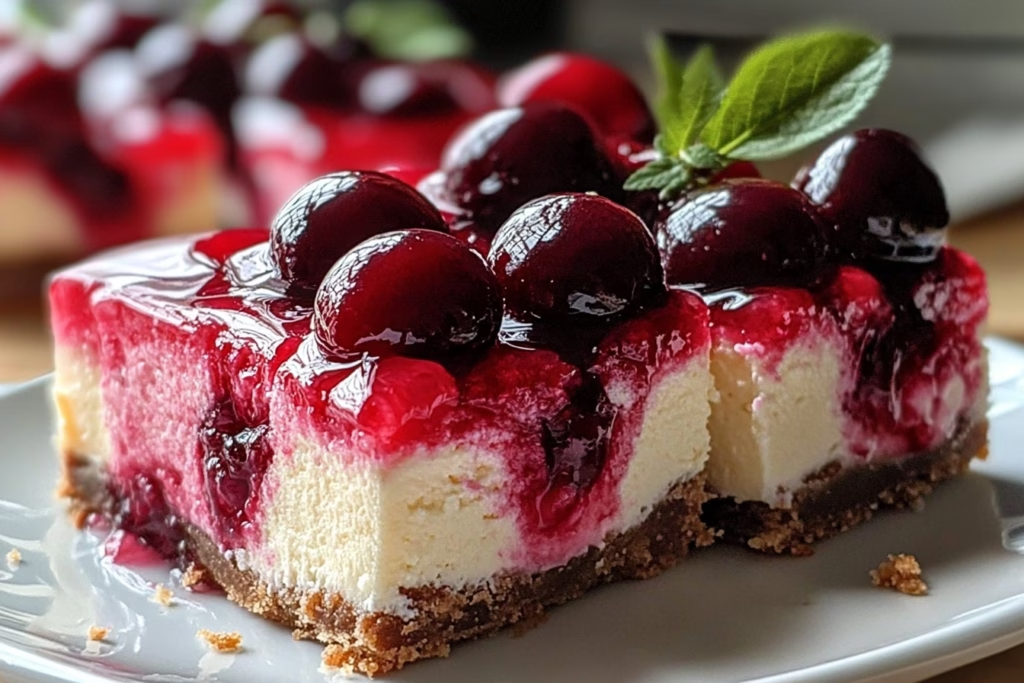
Oh my goodness, friends! I can’t even begin to tell you how much I adore Cherry Cheesecake Bars. Imagine a delightful summer day, the sun shining, and you take a bite of these creamy, dreamy bars topped with luscious cherry goodness. Honestly, they remind me of childhood picnics with my family when my aunt would whip up the best treats. This mouthwatering dessert is not only a nostalgic trip down memory lane, but it’s also a crowd-pleaser for any gathering. Plus, it’s way easier to make than a traditional cheesecake. Talk about a win-win!
I just love how simple these bars are to whip up. You don’t need to worry about cracking the top like you do with regular cheesecake. I mean, who wants the stress of a perfect bake anyway? These Cherry Cheesecake Bars are just as tasty, have that beautiful cherry topping, and a stunning presentation to boot. If you’re ready to impress your friends or treat yourself (because you deserve it!), let’s dive into what you’ll need and how to make them.
What’s in Cherry Cheesecake Bars?
Graham Cracker Crumbs: These little gems are the base of our crust, bringing that classic crunchy and sweet flavor. It’s like a hug from your favorite childhood dessert! I love using traditional graham crackers, but feel free to experiment with flavored ones if you’re feeling adventurous.
Granulated Sugar: This helps to sweeten both our crust and filling, making those flavors harmonize perfectly. I usually stick to regular granulated sugar because it’s what works best in this recipe, but if you want to lower the sugar count, you could try alternatives.
Unsalted Butter: We melt this little beauty to bind our crust together. It also adds that rich, buttery goodness that makes it oh-so-delicious!
Cream Cheese: The star of the show! It gives this dessert its rich, creamy texture. I always go for a good-quality cream cheese—my favorite brand is Philadelphia, but any reputable brand will do.
Vanilla Extract: A splash of vanilla adds warmth and depth of flavor to the cheesecake filling. I like using pure vanilla extract, but if you have vanilla bean paste, even better!
Eggs: Essential for binding! They give the cheesecake its structure and help it set perfectly.
Cherry Pie Filling: This topping is what ties our cherry cheesecake bars together. I love using the canned variety for its convenience, but if you’re feeling fancy, homemade cherry filling would be out of this world.
Cornstarch: This is optional but can help thicken the cherry topping if you like a firmer texture. If you decide to use it, make sure to mix it with water first to avoid lumps.
Is Cherry Cheesecake Bars Good for You?
Well, let’s face it: Cherry Cheesecake Bars are a dessert, and like all desserts, they should be enjoyed in moderation! But there are some bright sides:
Cream Cheese: While it’s rich, cream cheese does contain calcium and some protein. If you choose low-fat cream cheese, it can be a tad lighter in calories.
Cherries: The cherries in our topping bring a bit of healthiness to the party! They’re packed with antioxidants, and their natural sweetness helps balance out the richness of the cheesecake.
Of course, keep in mind that this dessert does have added sugars and fats, thanks to the sugar and butter. So, if you’re looking for a guilt-free treat, maybe save these for special occasions!
Ingredients List
– For the crust:
– 1 ½ cups graham cracker crumbs
– ½ cup granulated sugar
– ½ cup unsalted butter, melted
– For the cheesecake filling:
– 16 oz cream cheese, softened
– ½ cup granulated sugar
– 1 tsp vanilla extract
– 2 large eggs
– For the cherry topping:
– 1 can (21 oz) cherry pie filling
– 1 tbsp cornstarch (optional, for thickening)
– 1 tbsp water (optional, if using cornstarch)
*Serves: 16 bars*
How to Make Cherry Cheesecake Bars?
1. Preheat the oven to 325°F (160°C).
2. In a medium bowl, mix together the graham cracker crumbs, sugar, and melted butter until well combined.
3. Press the crumb mixture evenly into the bottom of a 9×9 inch baking dish to form the crust. Bake for 10 minutes, then remove and let cool.
4. In a large mixing bowl, beat the softened cream cheese using an electric mixer until smooth and creamy.
5. Add the sugar and vanilla extract, mixing until fully combined.
6. Beat in the eggs one at a time, mixing until just combined after each addition. Pour the cheesecake filling over the cooled crust and spread evenly.
7. Bake in the preheated oven for about 25-30 minutes, or until the cheesecake is set and slightly jiggles in the center. Remove and let cool completely at room temperature.
8. Once the cheesecake layer is cooled, spread the cherry pie filling evenly over the top. If using cornstarch for thickening, mix the cornstarch with water and stir it into the cherry filling before spreading.
9. Refrigerate the bars for at least 4 hours or overnight to set properly.
10. To serve, cut into squares and enjoy!
Cherry on Top: Extra Tips and Serving Suggestions
– You can garnish with fresh cherries or a dollop of whipped cream for an extra elegant presentation—seriously, it’s like putting a crown on the queen of desserts.
– If you have any leftovers (or let’s be honest—if you *can* save leftovers), these bars can be stored in the refrigerator for up to 5 days. They also taste amazing the next day after the flavors have had a chance to meld together!
– Feeling adventurous? Try adding some lemon zest to the cheesecake mix for a delightful citrus twist.
So there you have it! Cherry Cheesecake Bars that will leave you and your guests in dessert heaven. I can’t wait for you to take a stab at this recipe! And please, let me know how yours turn out. 🍒💖 Happy baking!


