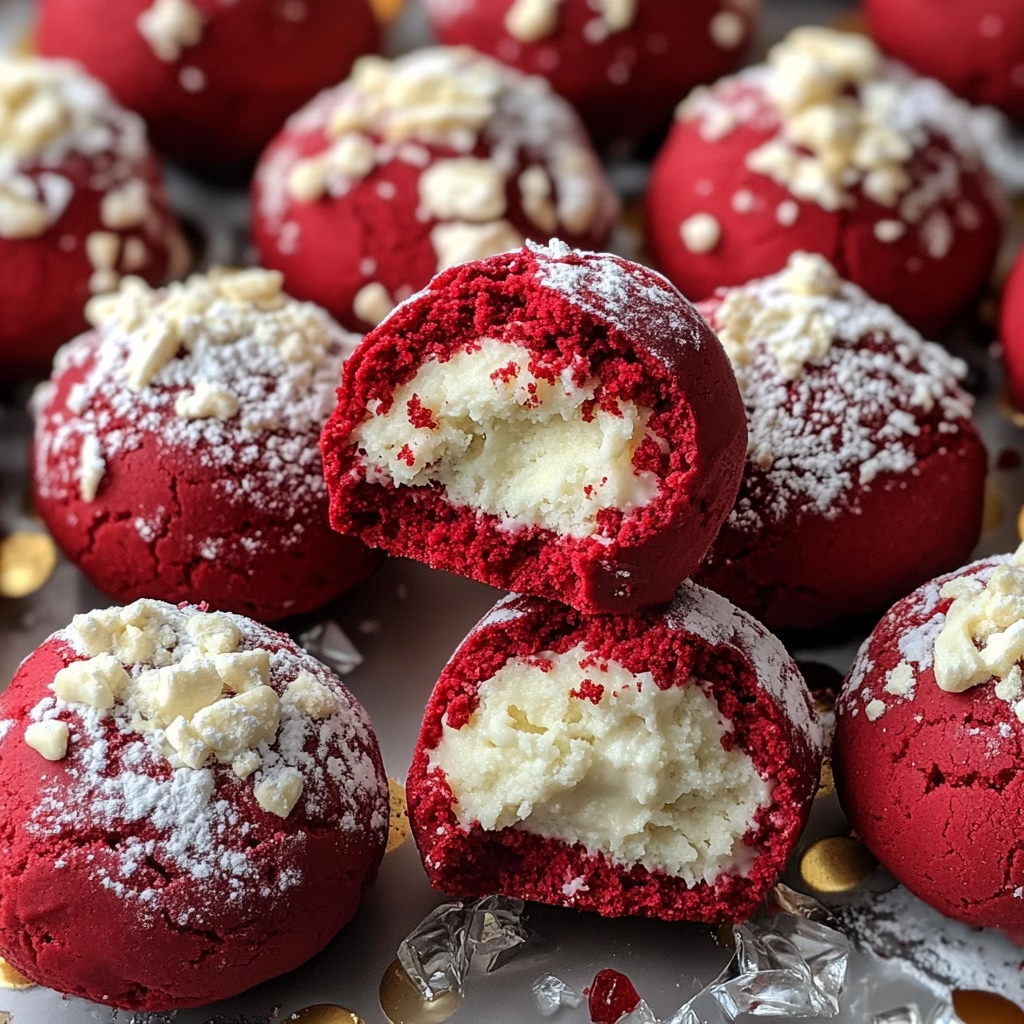
Oh, let me tell you about one of my absolute favorite cookie recipes: **Red Velvet Snowball Cookies with White Chocolate Filling**! These little delights not only look like a winter wonderland, but they also melt in your mouth with that perfect combination of rich red velvet and creamy white chocolate. Whenever I bake these cookies, they remind me of cozy holiday gatherings, when my family would gather around the kitchen, flour dusting our noses, and the smell of fresh cookies wafting through the air. It’s like they bring a little magic with each delicious bite!
You might be wondering, why snowball? Well, they’re rolled in powdered sugar and coconut, giving them that fluffy, snow-capped appearance. They make you feel all warm and snuggly inside—perfect for those chilly days! Plus, they are great for sharing during the holidays (or keeping all to yourself, no judgment here!). So, let’s get started and explore what makes these delightful cookies so special!
What’s in Red Velvet Snowball Cookies?
Unsalted Butter: The base for these cookies! I always recommend using unsalted butter so you can control the saltiness in your recipe. Plus, it helps achieve that fluffy texture we’re after.
Powdered Sugar: This sweetener gives these cookies a nice subtle sweetness and a smooth texture. We use it here both in the dough and for that dreamy dusting at the end!
Vanilla Extract: A splash of vanilla is like a warm hug in these cookies! It elevates the flavor and brings everything together beautifully.
All-Purpose Flour: This is the structure of our cookies. All-purpose flour is great for this recipe, lending that perfect chewy texture.
Cocoa Powder: To give these cookies that classic chocolate flavor—because red velvet isn’t just red; it’s velvet and chocolatey! I love using Dutch-processed cocoa for a deeper flavor.
Granulated Sugar: This adds a bit of grittiness and sweetness. You’ll roll your cookie balls in it for that extra touch!
Red Food Coloring: The star of the show! It turns our cookie dough that fabulous red color that we can’t get enough of. You can go for liquid or gel—just adjust the amount based on what you have.
Salt: A pinch of salt balances out the sweetness and enhances all of those flavors.
White Chocolate Chips: The ooey-gooey surprise filling! I love digging into one of these cookies and finding that melty, sweet filling. Use high-quality white chocolate for the best flavor.
Shredded Coconut: For that lovely snow-like garnish! It adds a bit of texture and a tropical vibe. I use sweetened shredded coconut because the contrast is just dreamy.
Additional Powdered Sugar: For dusting on top, of course! It gives the cookies a lovely snowball look.
Is Red Velvet Snowball Cookies Good for You?
Now, I won’t pretend that these cookies are health food, but they do have some aspects that can bring a smile to your face!
The star ingredient, **butter**, is high in saturated fats, but when enjoyed in moderation, it can be part of a balanced diet. **Cocoa powder** has antioxidants which can help combat free radicals in the body—so there’s that little win!
Additionally, **white chocolate** adds a creamy richness and—though it’s a bit more sugar-laden—can provide a sense of indulgence that can lift your spirits. I believe that soul food sometimes outweighs the “health” food!
However, keep in mind the sugar and fat content; moderation is key! These cookies are perfect for special occasions or to enjoy as a treat now and then.
Ingredients
– 1 cup unsalted butter, softened
– 1/2 cup powdered sugar
– 1 teaspoon vanilla extract
– 2 cups all-purpose flour
– 1/2 cup cocoa powder
– 1 cup granulated sugar
– 1 tablespoon red food coloring
– 1/2 teaspoon salt
– 1/2 cup white chocolate chips
– 1/2 cup shredded coconut, for garnish
– Additional powdered sugar for dusting
This batch will serve about 18 cookies, perfect for sharing (or hoarding for yourself—it’s fine!).
How to Make Red Velvet Snowball Cookies?
1. Preheat your oven to 350°F (175°C) and line a baking sheet with parchment paper.
2. In a mixing bowl, cream together the softened butter and powdered sugar until light and fluffy. You want to get that lovely airy texture!
3. Mix in the vanilla extract and red food coloring until well combined. It should look like liquid velvet at this point!
4. In a separate bowl, whisk together the all-purpose flour, cocoa powder, and salt. This will ensure everything is evenly mixed and prevents clumping.
5. Gradually add the dry ingredients to the wet mixture, mixing until a soft dough forms. Don’t be afraid to use your hands if it gets a little sticky!
6. Take about a tablespoon of dough and flatten it in your palm. Place a few white chocolate chips in the center, then fold the dough around the chocolate to form a ball. Make sure the chocolate is fully enclosed, or else you’ll have a molten surprise!
7. Roll each cookie ball in granulated sugar, then place them on the prepared baking sheet, spacing them about 2 inches apart.
8. Bake for 12-15 minutes, until the edges are set but the centers are still soft. They will continue to firm up as they cool—I promise it will be hard to resist the sweet aroma!
9. Once out of the oven, let the cookies cool on the baking sheet for about 5 minutes, then transfer them to a wire rack to cool completely.
10. Once cooled, roll each cookie in powdered sugar and then in shredded coconut for that snowy effect. You’ll really want to take a picture because they’re too cute!
11. Serve and enjoy your delicious Red Velvet Snowball Cookies!
Tips for Perfect Cookies
These cookies are an absolute crowd-pleaser, but here are a few hints to make them even better!
– For a richer flavor, try using high-quality cocoa powder. It makes a noticeable difference!
– Experiment with different fillings! You could use caramel balls, chocolate chunks, or even nuts for a delightful crunch.
– Store these in an airtight container for up to a week—if they last that long. I often put them in a pretty tin and gift them to friends during the holidays!
I absolutely adore these Red Velvet Snowball Cookies, and I hope you’ll give them a try! They’re a fun baking project that brings a bit of holiday cheer to any occasion. When you bake them up, I’d love to hear how it goes. Don’t forget to share photos of your beautiful creations! Happy baking!


