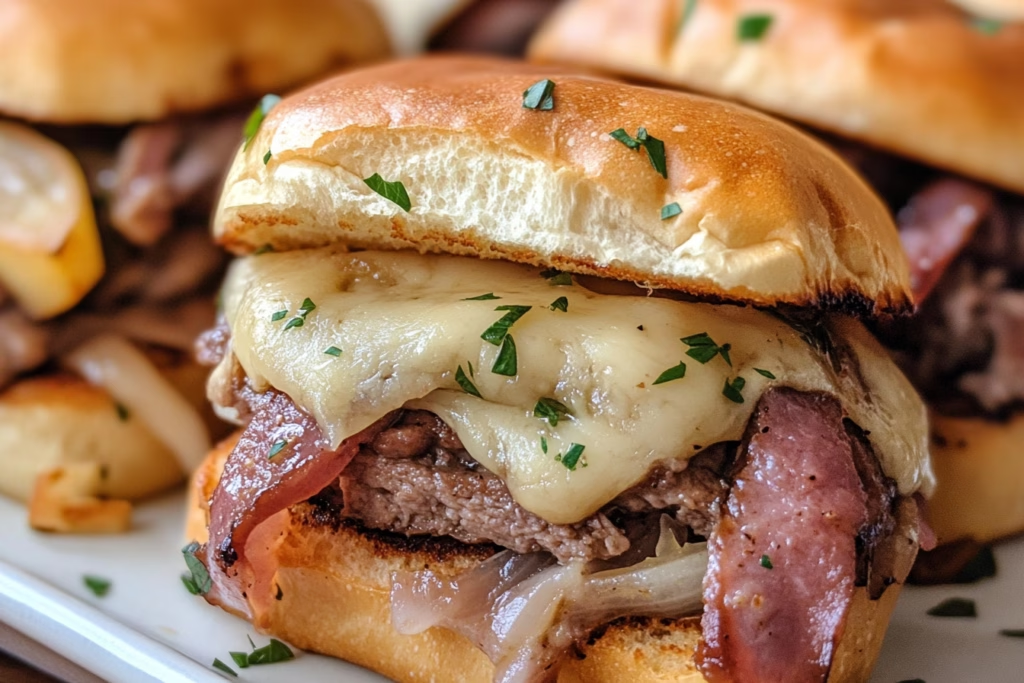
Ah, French Dip Sliders! Just saying the name makes my taste buds tingle with anticipation. There’s something utterly delightful about those warm, tender sliders filled with savory roast beef and gooey cheese, all waiting to be dunked into a warm pool of beef broth. It takes me back to those cozy evenings spent with friends, where laughter echoed around the table, and we savored delicious bites one after another.
You know, I first discovered this recipe at a potluck, and I couldn’t stop going back for seconds (and let’s be honest, thirds)! It’s a crowd-pleaser guaranteed to make you the star of any gathering. Plus, the best part? It’s so simple to whip up. Let’s dive into the delicious details of how to recreate this comfort food classic in your own kitchen!
What’s in The Best French Dip Sliders?
Slider Buns: The perfect vessel for all that juicy roast beef! I usually go for a soft and buttery variety that holds up well against dip.
Thinly Sliced Roast Beef: The star of the show! I always look for high-quality roast beef from the deli—it’s tender, flavorful, and adds that meaty goodness we crave.
Provolone Cheese: Melted wisdom! Provolone adds a delightful creaminess to these sliders. Feel free to switch it up with mozzarella if you want a milder flavor.
Unsalted Butter: For that rich, golden glaze on top! It’s a must for adding flavor and giving those buns a beautiful finish.
Worcestershire Sauce: A splash of umami that elevates our butter mixture, giving it a complex depth of flavor.
Garlic Powder and Onion Powder: Essential seasonings that provide a punch of flavor, making every bite irresistible.
Dried Parsley: A sprinkle of color and a subtle hint of earthiness to round out the flavor profile.
Salt and Pepper: Classic duo for seasoning! Never underestimate the power of a little salt to enhance those flavors.
Beef Broth: The magic elixir for dunking! Homemade or store-bought, it’s essential for the ultimate French dip experience.
Is The Best French Dip Sliders Good for You?
These sliders offer a hearty meal packed with protein thanks to the roast beef, which is beneficial for muscle repair and growth. Provolone cheese contributes calcium and helps strengthen bones, while the butter gives you a dose of necessary fats (though you might want to moderate if you’re watching your calorie intake!).
However, one thing to keep in mind is the sodium levels—both the roast beef and the broth can be a bit salty. If that’s a concern for you, try to opt for low-sodium versions wherever possible!
Ingredients
– 1 package (12-count) slider buns
– 2 cups thinly sliced roast beef
– 1 cup provolone cheese slices
– 1/2 cup unsalted butter, melted
– 1 tbsp Worcestershire sauce
– 1 tsp garlic powder
– 1 tsp onion powder
– 1/2 tsp dried parsley
– Salt and pepper to taste
– 2 cups beef broth for dipping (or homemade)
This recipe serves about 6, but let’s be real—you’ll probably want more than one slider!
How to Make The Best French Dip Sliders?
1. Preheat your oven to 350°F (175°C) so it’s nice and hot by the time you’re ready to bake.
2. In a small bowl, mix together melted butter, Worcestershire sauce, garlic powder, onion powder, dried parsley, and a pinch of salt and pepper. This mixture is going to be the secret to our golden tops!
3. Place the bottom half of the slider buns in a baking dish. Layer half of the provolone cheese right on those buns.
4. Now it’s time to pile on the thinly sliced roast beef, making sure it’s spread evenly over the cheese.
5. Top that delicious beef with the rest of the provolone cheese, then finally place the top half of the buns on top.
6. Brush your butter mixture generously over the tops of the buns. Get it into all the nooks and crannies!
7. Grab some aluminum foil and cover the baking dish, then pop it in the oven for 15 minutes. After that, remove the foil and let it bake for another 10 minutes or until they are beautifully golden brown and the cheese is melted and bubbly.
8. While those sliders are baking to perfection, heat the beef broth in a small pot over medium heat until it’s warm and inviting.
9. Once the sliders are out of the oven, let them cool for a couple of minutes before slicing them into individual sliders—don’t burn your fingers!
All the Sweet Slidin’ Tips!
– To make your prep easier, you can assemble the sliders a few hours ahead of time. Just cover and store in the refrigerator until you’re ready to bake them. This makes them perfect for parties!
– Pair with crispy fries or a refreshing side salad to balance out the heaviness of the sliders.
– Feel free to get creative! You can sprinkle some sautéed mushrooms or caramelized onions inside for an extra flavor boost.
I can’t tell you enough how much joy these French Dip Sliders bring to the table (and how fast they disappear!). I hope you give them a try, and don’t forget to let me know how they turn out. Happy cooking, and may your sliders always be delicious!


